
Building and running WRF on a Raspberry Pi
This blog post provides details of how to build the Weather Research and Forecasting model (WRF) to run on a Raspberry Pi. These notes have been tested with WRFv4.1.2 on a Raspberry Pi 2. The build process is essentially the same as that for a regular Unix-based PC, with some minor adjustments to the configuration settings to build for the Pi’s ARM processor. It is also necessary to make use of an external hard drive to act as a swap space during compilation, as a workaround for the limited amount of RAM.
Requirements
To build WRF, we will use the GNU fortran and C compilers. WRF also requires several libraries to be installed on your Pi, such as NetCDF and MPICH; details of how to build these are included below.
Obtaining the GNU fortran and C compilers
Within Raspbian, open a terminal and enter the following commands:
sudo apt update
sudo apt upgrade
sudo apt-get install csh
which gcc (this should confirm that gcc is already installed; if not, do sudo apt-get install gcc)
sudo apt-get install gfortran
We will now create a directory within which we will build the necessary libraries required by WRF:
cd ~
mkdir -p build_WRF/libraries
MPICH installation
First, we will install the MPICH library, following the instructions written by Peter Cox at the University of Southampton. The instructions below are based on points #11 to #28 from Peter’s webpage here.
mkdir -p /home/pi/software/mpich3
cd /home/pi/software/mpich3
The latest version of the MPICH source code can be obtained here. At the time of writing, the latest version is 3.3.1:
wget http://www.mpich.org/static/downloads/3.3.1/mpich-3.3.1.tar.gz
Unpack the tarball:
tar xfz mpich-3.3.1.tar.gz
Make a build directory, so we keep the souce directory clean of build things:
mkdir mpich_build
cd mpich_build
Now configure the build:
../mpich-3.3.1/configure --prefix=/home/pi/build_WRF/libraries/mpich3-install
Make the files:
make
Install the files:
make install
Add the installation path to your $PATH:
export PATH=$PATH:/home/pi/build_WRF/libraries/mpich3-install/bin
NB - add the two lines below to your .profile to permanently add the MPI libraries to your PATH:
#Add MPI to PATH
PATH="$PATH:/home/pi/build_WRF/libraries/mpich3-install/bin"
Check to make sure things installed OK:
which mpicc
which mpiexec
Change directory back to home and create a new directory within which we will perform the mpi tests:
cd ~
mkdir -p ~/software/mpich3/mpi_testing
cd ~/software/mpich3/mpi_testing
Now test whether MPI works on a single node:
mpiexec -hosts 127.0.0.1 -n 1 hostname
This should return the output raspberry.
Now let’s run the C code test to calculate the value of pi. Within the mpi_testing directory, do:
mpiexec -hosts 127.0.0.1 -n 2 ~/software/mpich3/mpich_build/examples/cpi
This should correctly show two processes and the approximate value of pi.
NetCDF installation
The latest versions of NetCDF can be obtained from the UniData website; at the time of writing, the latest netcdf-c is 4.7.2 and netcdf-fortran 4.5.2.
First, let’s create some directories:
mkdir -p /home/pi/software/netcdf
cd /home/pi/software/netcdf
Now let’s download the tar files and extract them:
wget https://www.unidata.ucar.edu/downloads/netcdf/ftp/netcdf-c-4.7.2.tar.gz
wget https://www.unidata.ucar.edu/downloads/netcdf/ftp/netcdf-fortran-4.5.2.tar.gz
tar xzvf netcdf-c-4.7.2.tar.gz
tar xzvf netcdf-fortran-4.5.2.tar.gz
Once you have downloaded and extracted the tarballs in your chosen location, change to the netcdf-c directory first:
cd netcdf-c-4.7.2
mkdir netcdf-c-build
mkdir netcdf-f-build
cd netcdf-c-build
Building with full NetCDF4 support requires hdf5, zlib and curl libraries. However, for this example we will proceed without NetCDF4 support, i.e. classic library support only, in which case hdf5, zlib and curl aren’t needed. If you do wish to proceed with NetCDF4 instead, you will need to build the dependencies from source; see here for details.
To build without NetCDF4 features, enter the following:
../netcdf-c-4.7.2/configure --prefix=/home/pi/build_WRF/libraries/netcdf-install --disable-dap --disable-netcdf-4 --disable-shared
make
make install
export PATH=/home/pi/build_WRF/libraries/netcdf-install/bin:$PATH
export NETCDF=/home/pi/build_WRF/libraries/netcdf-install
It is recommended to add these environment variables to your .profile.
Net we need to install netcdf-fortran libraries too…
cd ../netcdf-f-build
Now set CPPFLAGS and LDFLAGS so that the build knows where to find the netcdf-c libraries and include files:
export CPPFLAGS=-I/home/pi/build_WRF/libraries/netcdf-install/include
export LDFLAGS=-L/home/pi/build_WRF/libraries/netcdf-install/lib
Then proceed to run the configure script before building:
../netcdf-fortran-4.5.2/configure --prefix=$NETCDF --disable-shared
make
make check install
Other libraries
Now for the remaining dependencies. Not sure it is needed, but for completeness, install m4 pre-processor:
sudo apt-get install m4
To enable support for GRIB2 input data (recommended), it is also necessary to install zlib, libpng and jasper from source:
cd ~
cd software
mkdir zlib
cd zlib
wget https://zlib.net/zlib-1.2.11.tar.gz
tar xzvf zlib-1.2.11.tar.gz
cd zlib-1.2.11
./configure --prefix=/home/pi/build_WRF/libraries/grib2-install
make
make install
cd ../..
mkdir libpng
cd libpng
wget http://prdownloads.sourceforge.net/libpng/libpng-1.6.37.tar.gz
tar xzvf libpng-1.6.37.tar.gz
cd libpng-1.6.37
./configure --prefix=/home/pi/build_WRF/libraries/grib2-install
make
make install
cd ../..
git clone https://github.com/mdadams/jasper.git
For jasper, need to install cmake first:
sudo apt-get install cmake
sudo apt-get install libjpeg-dev
Then build the jasper libraries as follows (using the info in jasper/INSTALL as a guide):
cd jasper
mkdir jasper_build
cmake -G "Unix Makefiles" -H/home/pi/software/jasper -B/home/pi/software/jasper/jasper_build -DCMAKE_INSTALL_PREFIX=/home/pi/build_WRF/libraries/grib2-instal
l -DJAS_ENABLE_SHARED=true
cd jasper_build
make clean all
make test
make install
Then do:
export JASPERINC=/home/pi/build_WRF/libraries/grib2-install/include
export JASPERLIB=/home/pi/build_WRF/libraries/grib2-install/lib
Building WRF
Now we have installed the required dependencies, we can proceed with the WRF build itself. The first step is to retrieve the WRF source code from github. I have created a fork of the WRF and WPS codes from the wrf-model github account. This fork of WRF has been modified to allow WRF to be configured for the Raspberry Pi’s ARM CPU. To clone these repositories, enter the following:
cd ~/build_wrf
git clone https://github.com/deardenchris/WRF
git clone https://github.com/deardenchris/WPS
This will automatically retrieve the latest version of WRF, currently v4.1.2 at the time of writing. To specify a different branch, use git clone --branch v4.x.x https://github.com/deardenchris/WRF
cd WRF
You can confirm which version you have cloned by opening the file WRF/inc/version_decl
Before we configure, we need to enable large file support for netCDF:
export WRFIO_NCD_LARGE_FILE_SUPPORT=1
Then run the configure script:
./configure
and select the option for dmpar with gfortran. This will produce a configure.wrf file. Within this file, you should make sure that the correct paths to your NetCDF libraries are specified in LIB_EXTERNAL, i.e.
LIB_EXTERNAL = -L$(WRF_SRC_ROOT_DIR)/external/io_netcdf -lwrfio_nf \
-L/home/pi/build_WRF/libraries/netcdf-install/lib -lnetcdff -lnetcdf
If you encounter any mpich related errors during compilation, try appending the following to LIB_EXTERNAL:
-L/home/pi/build_WRF/mpich3-install/lib -lmpich -lopa -lmpl
Because the WRF compilation requires a lot of memory, it is necessary to set up an external hard drive to act as a swap space in order for WRF to compile successfully on the Pi. In summary, the steps are: connect a USB HD to your Pi, then edit the file /etc/dphys-swapfile so that it contains the following two lines:
CONF_SWAPSIZE=2048
CONF_SWAPFILE=/mnt/sda1/swap.file
This sets up a 2GB swap space on the USB hard drive. NOTE: sda1 is my usb hard drive which is automounted - you may need to change this for your own system depending on how your own HD is mounted.
Now you are ready to compile WRF with:
./compile em_real >&compile_out&
Compiling WPS
cd ../WPS
./configure
(choose ‘serial’ option; should auto-detect libs for jasper, zlib and libpng; can check in configure.wps)
Then compile by running ./compile
When compiling WPS on the Pi, you may get an error relating to some code in ungrib/src/ngl/g2/intmath.f. This issue has been documented here, along with a suggested workaround.
Also note that unmounting your USB hard drive will cause your system to crash if you do not turn off the swap first. Thankfully, after compilation is complete you can disable the swap with the following command:
swapoff /mnt/sda1/swap.file
WRF compilation can take a good couple of hours on a Pi that uses an external HD as swap space.
Running a case study
Once complete, you can test your installation by running the Katrina test case example.
NB - to get ungrib.exe to run, you will need to add the grib2-install libraries to your $LD_LIBRARY_PATH:
export LD_LIBRARY_PATH=$LD_LIBRARY_PATH:/home/pi/build_WRF/libraries/grib2-install/lib
The 24-hour simulation uses a 3 minute timestep and a domain size of 98x70 points, with a 30 km horizontal grid-spacing. Across 3 cores, it took about 50 minutes to complete on my Pi2.
Running WRF on a Pi Cluster
If you have access to multiple Raspberry Pi’s, you can create a mini cluster and use it to run larger WRF simulations than would be possible on a single Pi. This final step describes how I managed to get WRF to run across a pair of Raspberry Pi 2’s, thereby utilising all 8 processors of a fully ARM’d and operational Pi Cluster…
First of all, I decided to set up my home router to reserve a static IP address for each of my Pi’s, rather than allowing my router to allocate the IP addresses dynamically (the reasons for doing so will become apparent later). For a given MAC address, it is possible to reserve a specific IP address by adjusting your router’s DHCP settings.
Following Peter Cox’s instructions (#29 - #32), I cloned my microSD card (the one containing the successful WRF installation) and flashed it to a second microSD, which I then inserted into my second Raspberry Pi. Here is a picture of my configuration:
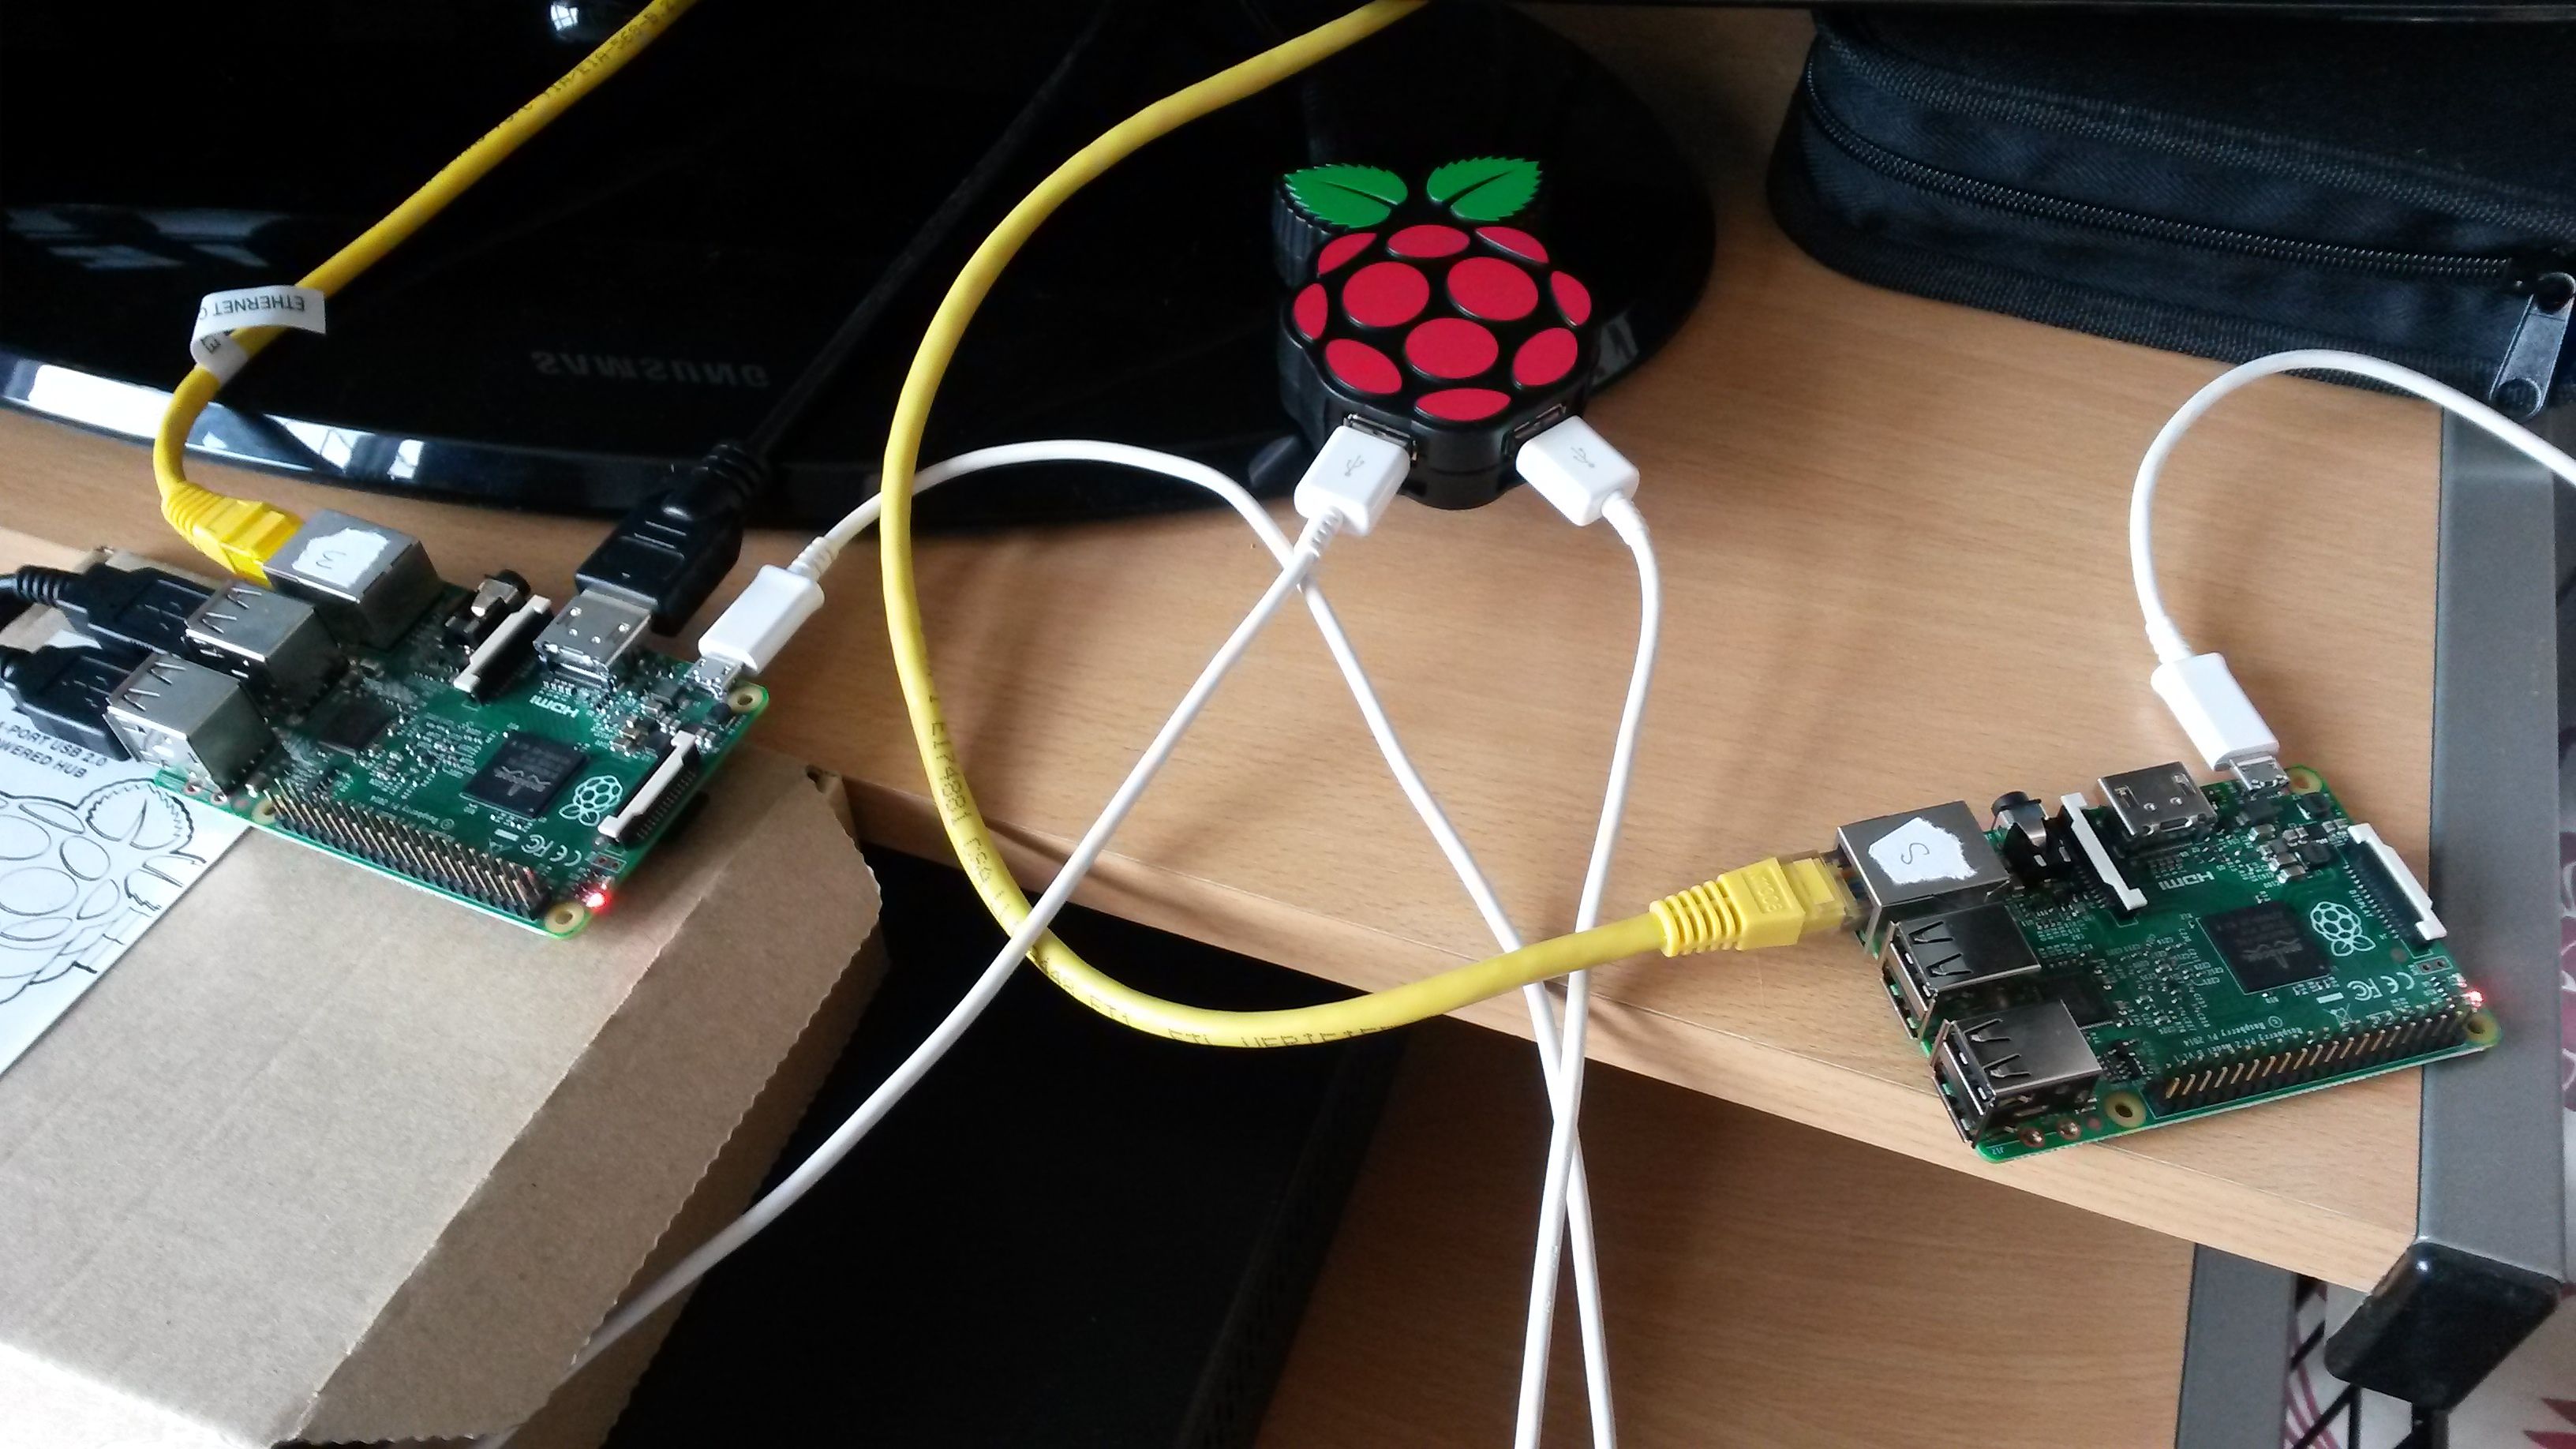 My Pi Cluster – a pair of Raspberry Pi 2’s running off a 3A PiHub
You can see the PiHub is being used to power both Pi’s via USB. The Pi on the left is the ‘main’ Pi, with a USB keyboard and mouse connected, and HDMI out to my Samsung 32″ TV. The Pi on the right is the ‘secondary’ device, and is run headless. Both Pi’s are connected to my home router via the yellow ethernet cables; this is how the main Pi will communicate with the secondary Pi. Because the secondary Pi is run headless, it must be accessed via ssh from the main Pi. For this I need to know its IP address. Here the advantage of reserving a fixed IP address becomes clear – by using a static IP address there is no risk of it being re-assigned as would be the case with a dynamic address.
I then proceeded to follow steps #33 - #37 to enable the main Pi to ‘see’ the additional CPU cores available on the secondary Pi. First I had to generate a pair of ssh keys to facilitate access to the secondary Pi from the main Pi. I then created a machinefile on the main Pi to tell MPI which machines to run WRF on. This is specified as a list of IP addresses; in our case, it will be the two static IP addresses we reserved earlier.
It is also a good idea to change the hostname of the secondary Pi, since by default both Pi’s will have the same name of raspberrypi and this can get confusing. To do this, you need to edit both the /etc/hostname and /etc/hosts files on the secondary Pi, and change raspberrypi to something else, e.g. secondarypi. You then need to reboot the secondary Pi (‘sudo reboot’) for the changes to take effect.
To attempt to run WRF across all 8 available cores, from the main Pi, cd to test/em_real in your WRF directory, and enter the following:
mpiexec -f ~/machinefile -np 8 ./wrf.exe >&wrf_exe_out&
To check it is working as expected, you can run the top command on both the main and secondary Pi, and you should see 4 wrf processes running on each. The wrf_exe_out file should also contain information on how many MPI tasks are running.
From here, you are free to configure WRF to run whichever type of weather case study you are interested in, your only constraint being the computational limits of the Pi cluster. Of course, you can always add more Pi’s to your cluster as well if you so wish. Good luck!